

Drawing a Christmas tree is a fun way to enjoy the holiday season. You do not need expensive art supplies or years of practice. A pencil, paper, and a little patience are enough to begin. A simple christmas tree drawing can become a handmade card, classroom activity, holiday decoration, or relaxing art project. You can keep your tree simple or fill it with colorful ornaments, lights, gifts, ribbons, and snow. The best part is that every tree can look different. Some artists prefer a cute cartoon style. Others enjoy realistic branches and natural details. Children may use basic triangle shapes, while older artists can practice shading and texture. This guide takes you through the complete process in clear steps. You will learn how to plan the shape, draw branches, add decorations, create depth, use color, and fix common mistakes. By the end, you will have the skills to create a festive tree in your own personal style.
Why Christmas Trees Are Fun to Draw
Christmas trees are excellent drawing subjects because they can be simple or detailed. A beginner can create one using only a few basic shapes. An experienced artist can spend much longer adding individual needles, shadows, ornaments, and realistic lighting. This flexibility makes the subject suitable for children, students, families, and adults. It also gives you freedom to experiment without worrying about one perfect result. Christmas trees are naturally full of interesting shapes. Their wide bottoms, narrow tops, layered branches, and bright decorations create an attractive composition. You can also change the mood through color. Bright red and gold decorations create a traditional holiday look. Pink, silver, or blue ornaments can produce a modern style. A snowy tree feels peaceful, while a colorful cartoon tree feels playful. Drawing the same subject several times is also a useful way to see your artistic progress.
Supplies You Need Before You Start
You do not need a large art kit for a good christmas tree drawing. Start with plain drawing paper and a regular pencil. An HB pencil works well for basic sketching because its marks are easy to control. Keep an eraser nearby for correcting guidelines. If you want darker outlines, use a black fine-tip pen after finishing your pencil sketch. Colored pencils are excellent for beginners because they allow controlled color and simple shading. Crayons work well for younger artists. Markers create brighter colors but are less forgiving of mistakes. Watercolor or paint can be added if you want a more artistic finish. A ruler can help with cards or symmetrical designs, although a perfectly straight tree is not necessary. Keep a scrap sheet beside you for testing colors and pen thickness. Good tools help, but careful observation and practice matter much more than expensive supplies.
Start With the Basic Christmas Tree Shape
Begin by lightly marking the center of your paper. This imaginary line will help keep the tree balanced. Next, place a small point near the upper part of the page. This will become the top of the tree. From that point, imagine two lines spreading downward and outward. Together, these create the overall triangular form. Do not draw one large perfect triangle with a heavy outline. Instead, use it as a loose guide for the branches. Leave space beneath the tree for the trunk and gifts. You should also leave some room above the top for a star or another tree topper. Keep your first lines very light. These are planning marks, not final details. Beginners often press too hard at this stage and later struggle to erase unwanted lines. A light sketch gives you freedom to change the size, angle, or position before adding detailed branches.
How to Draw the Tree in Simple Layers
One easy way to build a christmas tree drawing is to divide the tree into three or four sections. Start near the top with a small pointed layer. Draw the next layer slightly wider. Continue downward, making each section broader than the one above it. Think of these layers as groups of branches rather than perfect geometric shapes. Their lower edges can have small curves, points, and uneven sections. Real evergreen trees are not perfectly symmetrical. A little variation makes the drawing feel more natural. Avoid making every layer exactly the same height. The lower part should feel heavier and fuller than the top. Once the main layers are in place, look at the entire silhouette. The tree should gradually widen from top to bottom. If one side looks too wide, make a small adjustment before adding decorations. This simple layered method creates a clear structure that is easy for beginners to understand.
Drawing Natural Evergreen Branches
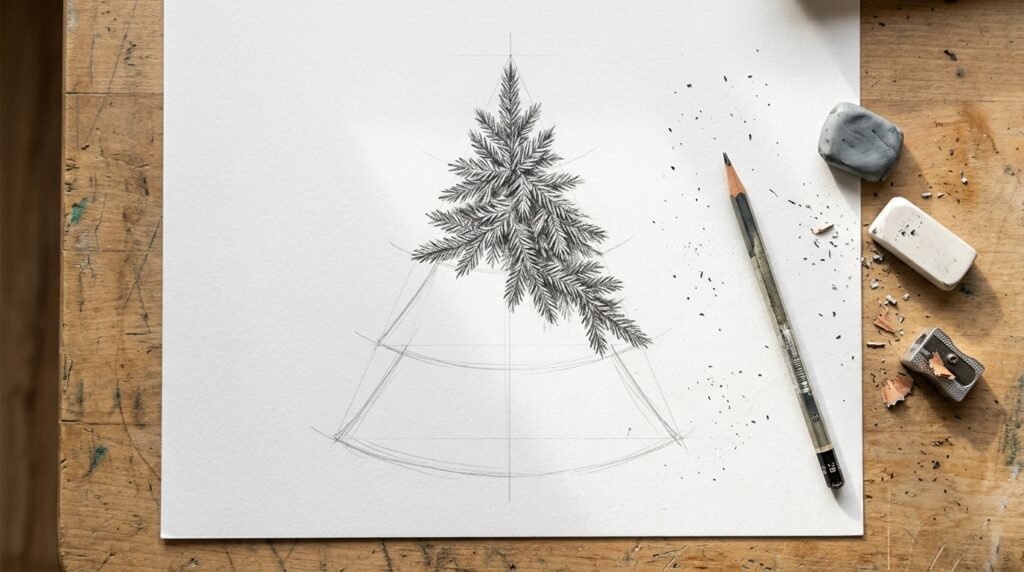
After creating the main shape, you can make the branches more natural. Instead of leaving smooth triangular edges, break them into smaller branch tips. Draw short lines that extend outward and slightly downward. Some tips can point upward, while others can bend toward the ground. Avoid repeating the same shape again and again. Natural trees contain small differences. Add a few short branches inside the outer silhouette as well. These lines suggest layers of foliage. Do not fill every empty space. Leaving small gaps helps viewers see individual branch groups. The lower branches should usually appear longer and heavier. Branches near the top can remain shorter and thinner. If you want a cartoon tree, use soft curved branch shapes instead. For a realistic tree, use irregular lines and overlapping layers. The goal is not to draw every pine needle. You only need enough visual information to suggest a full evergreen tree.
How to Draw the Trunk
The trunk is a small detail, but it helps support the entire design. Draw two short vertical lines extending downward from the center of the lowest branches. Connect them at the bottom with a slightly curved or straight line. Do not make the trunk too wide. Most of it would naturally be hidden behind dense lower branches. Add a few light vertical marks if you want to suggest bark texture. Brown is the obvious color choice, but you can also use dark gray or muted brown for a softer appearance. If your tree is displayed in a decorative stand or tree skirt, much of the trunk may not be visible. A tree skirt can be drawn as a wide oval or flowing piece of fabric around the base. Keeping this area simple prevents it from competing with the brighter ornaments and lights above.
Adding a Star or Tree Topper
A topper creates a strong finishing point at the top of your christmas tree drawing. The classic choice is a five-point star. Begin with a small star centered just above the highest branch. Keep its size balanced with the tree. A very large star can make the tree look smaller than intended. If drawing a perfect star feels difficult, practice it once or twice on scrap paper. You can also choose a simpler topper. An angel, bow, snowflake, glowing circle, or decorative ornament can work beautifully. For younger children, a basic star shape is usually easiest. Add a small line or base showing how the topper connects to the tree. Later, use yellow, gold, silver, or another bright color to make it stand out. A few light rays around the topper can suggest a glow. Keep those rays subtle so they do not distract from the main tree.
How to Draw Christmas Tree Ornaments
Ornaments bring personality and color to your tree. Start with simple circles placed across different branches. Vary their sizes slightly so the arrangement does not feel mechanical. Add small rectangles or curved hooks at the top of each ornament. You can then introduce other shapes, including stars, bells, candy canes, hearts, snowflakes, and small gift ornaments. Spread decorations throughout the tree rather than placing them all in the center. Avoid making every ornament identical. A mix of shapes and sizes creates more visual interest. However, do not add so many decorations that the branches disappear completely. Leave areas of green foliage visible between them. If you are using a limited color palette, repeat the same three or four colors across the tree. Red, gold, green, and white create a classic style. Blue and silver can produce a cooler winter look.
Adding Christmas Lights
Lights can transform a simple sketch into a festive scene. Begin by drawing a thin curved wire that moves gently across the branches. The wire can travel from one side to the other in loose waves. Do not make every curve identical. Next, add tiny bulbs along the line. Basic oval or teardrop shapes work well. Keep them fairly small compared with the ornaments. For a colorful christmas tree drawing, use red, yellow, blue, green, pink, and orange bulbs. For an elegant design, use warm yellow or white lights. To create a glowing effect, leave a small bright area around each bulb. You can also add a very light yellow halo around selected lights. Avoid outlining the glow with a dark pencil because that can make it look like another object. The brightest lights should usually appear near darker green branches, where the contrast makes them more noticeable.
How to Draw Garland and Ribbon
Garland adds movement across the tree and helps connect separate decorations. Draw long curved lines that gently wrap from one side of the tree to the other. Imagine a ribbon resting on the outer branches rather than cutting through them. The curves should become wider toward the bottom because the tree itself becomes wider. You can create a simple ribbon using two parallel curved lines. Add folds where the ribbon changes direction. For tinsel, use a thinner irregular line with small reflective marks. Be careful not to combine too many strong decorative elements. If your tree already has many ornaments and lights, a large ribbon can make the design feel crowded. A simple garland may work better. For a more elegant tree, use one wide ribbon as the main decoration and keep ornaments smaller. This creates a clear visual focus and makes the finished artwork easier to read.
Drawing Presents Under the Christmas Tree
Presents make the lower part of the composition more interesting. They also help your christmas tree drawing tell a holiday story. Start with simple rectangles and squares beneath the branches. Draw some boxes slightly behind others to create depth. Add vertical and horizontal ribbon lines across each box. Finish each gift with a bow. You can keep bows simple by using two loops and two hanging ribbon ends. Use different box sizes, but avoid making every package perfectly aligned. Slight overlaps look more natural. You can also add a round gift box, toy, stocking, or small bag for variety. Choose wrapping-paper colors that match the ornaments above. Small patterns such as dots, stars, stripes, or snowflakes can make the gifts more detailed. Keep these patterns simple because tiny decorations can quickly become messy. The presents should support the tree visually rather than becoming the main subject.
Creating a Snowy Christmas Tree
Snow gives your drawing a peaceful winter atmosphere. Start by placing soft, uneven white sections on the upper surfaces of the branches. Snow naturally collects on areas that face upward, so avoid covering every part of the tree evenly. Keep some green visible beneath the snow. For pencil drawings, leave snow areas mostly white and shade gently underneath them. This creates the illusion of depth. With colored pencils, use pale blue or light gray shadows along the bottom edges of snowy sections. You can add small circles or dots around the tree to represent falling snow. Vary their sizes and spacing. Avoid making every snowflake identical. Add a soft snow layer on the ground beneath the tree if you want a complete outdoor scene. A few subtle shadows beneath the tree and presents can help them feel connected to the snowy surface.
Easy Christmas Tree Drawing for Kids
Children usually enjoy drawing more when the steps are simple and forgiving. Start with three large triangle-like sections stacked from smallest to largest. Add a small rectangle for the trunk and a star at the top. Next, draw large round ornaments that are easy to color. A simple curved line can represent the lights or garland. Add several square presents at the bottom. Children do not need realistic branch texture or perfect symmetry. Encourage them to choose their own colors and decorations. One child may want a rainbow tree, while another may draw a green tree covered with red ornaments. Both choices are valid. The activity should build confidence rather than focus on perfect results. Thick crayons, washable markers, and colored pencils work well for young artists. Adults can demonstrate each step on separate paper instead of correcting the child’s lines. This keeps the activity creative and enjoyable.
Cute Cartoon Christmas Tree Style
A cartoon christmas tree drawing uses simple shapes, smooth outlines, and exaggerated details. Start with a short, wide tree rather than a tall realistic shape. Use rounded branch edges and a slightly curved trunk. Make ornaments larger than normal so they are easy to see. You can even add a smiling face to the tree. Two round eyes and a small curved mouth create a friendly character. Add rosy cheeks with small pink circles. Presents can have oversized bows, while the star can be large and slightly tilted. Cartoon art does not need realistic proportions. In fact, exaggerated proportions often make the picture more charming. Use clean, bold outlines after finishing the pencil sketch. Bright colors work especially well for this style. Keep shading minimal and use simple highlights on ornaments. This approach is ideal for greeting cards, classroom worksheets, children’s crafts, stickers, and cheerful holiday illustrations.
How to Draw a Realistic Christmas Tree
A realistic tree requires more observation and patience. Begin with a light overall shape, but avoid creating perfectly smooth edges. Real evergreen trees have uneven branch lengths and small gaps between sections. Build the foliage using overlapping branch groups. Near the outer edges, add smaller twigs extending from larger branches. Instead of drawing every needle, use short directional strokes to suggest dense foliage. Keep some interior areas darker because less light reaches deep branches. Branch tips exposed to light can be slightly brighter. Use reference photos if possible because they help you understand natural growth patterns. Decorations should also follow the tree’s form. An ornament hanging from a branch should appear connected to that branch rather than floating in empty space. Remember that realism comes from believable light, depth, proportion, and texture. It does not require drawing thousands of individual needles.
How to Add Depth and Dimension
A flat drawing can become much stronger when you add simple depth. Start by deciding where the light comes from. For example, imagine light entering from the upper left. Branches facing that direction should appear slightly lighter. Areas on the opposite side can be darker. Add deeper shadows between overlapping branch layers. These darker spaces help separate the front foliage from the back foliage. Ornaments also need basic shading. Leave a small highlight on the side facing the light. Darken the opposite edge. This makes a round ornament look three-dimensional. Use the same idea on gifts and the tree trunk. The darkest areas should not cover the entire tree. Keep a range of light, medium, and dark values. A balanced mix gives your christmas tree drawing more depth without making it difficult to understand. Beginners can create a strong effect with only two or three shades of green.
Choosing the Best Green Colors
A natural tree rarely appears as one flat shade of green. Use several greens to create depth and visual interest. Begin with a medium green as the main color. Add darker green between branches and near the inner parts of the tree. Use lighter green on branch tips that catch more light. You can mix small amounts of blue into darker areas for a cooler winter mood. Yellow-green highlights can make warm areas feel brighter. Avoid covering your original sketch with heavy color immediately. Build color in light layers. Colored pencils work especially well for this method. If you are using markers, choose two or three related green shades and test them first. For a cartoon tree, one bright green may be enough. A realistic tree benefits from greater variation. Your goal is not to match one exact green but to create enough contrast for individual branch layers to remain visible.
Traditional Christmas Color Ideas
Red, green, gold, and white are classic holiday colors. They work well because they create strong contrast while still feeling connected to Christmas traditions. Start with deep green foliage and add bright red ornaments. Use gold for the star, ribbon, bells, and selected decorations. White can appear as snow, lights, or highlights. If you want a warmer result, include small touches of orange or cream. Avoid using every bright color equally. Choose one main decoration color and one or two supporting colors. This gives the artwork a more organized appearance. For example, red can dominate the ornaments while gold appears only on ribbon and the topper. Another option is a red-and-white candy theme with striped decorations. Traditional colors are especially suitable for greeting cards, school projects, printable art, and family holiday decorations because viewers immediately understand the festive theme.
Modern Christmas Tree Color Ideas
Modern holiday artwork does not need to follow traditional red and green. Try silver and blue for a cool winter theme. Pink and gold can create a softer, playful look. White, champagne, and beige work well for a simple neutral design. Black and gold can produce a dramatic modern style when used carefully. The tree itself can even be white, pale blue, or pink if you are creating an imaginative illustration. A modern christmas tree drawing often looks best with fewer decorations and a controlled palette. Choose two or three main colors and repeat them throughout the ornaments, gifts, and topper. Leave some open areas so the composition can breathe. Simple geometric ornaments also support a modern look. You can use circles, diamonds, stars, and clean ribbon shapes. Color choices are personal, so experiment until you find a combination that fits the mood you want.
Drawing a Christmas Tree With Pencil Only
You can create beautiful holiday artwork without using any color. Pencil drawings depend on line weight, texture, and shading. Begin with very light construction lines. Build the branch shapes using short strokes. Use darker pressure inside the tree and beneath overlapping branches. Keep the outer branch tips lighter where they catch more light. Ornaments can be separated from foliage using bright highlights and darker edges. Leave the star almost white if you want it to appear glowing. Use soft shadows beneath gifts to connect them to the floor. A blending stump or clean tissue can soften large shaded areas, but do not blend every mark. Visible pencil strokes can create useful evergreen texture. Use an eraser to lift small highlights from ornaments or snow. Pencil-only art is excellent practice because it teaches you how light and dark values create form without relying on color.
Using Colored Pencils
Colored pencils are beginner-friendly because they provide excellent control. Start with light pressure and gradually build stronger colors. This technique prevents harsh marks that are difficult to correct. Layer different green shades across the branches. Add darker green near the center and lighter green toward the tips. For ornaments, begin with a base color and add a darker shade along one edge. Leave a tiny white highlight to create shine. Use yellow, cream, or pale orange around lights for a warm glow. You can also layer colors. Blue over dark green can create rich shadows, while yellow over green creates warmer highlights. Keep your pencil tips sharp for small decorations and branch details. Use broader strokes for large areas. Avoid pressing extremely hard until the final layers. Gradual color building gives you more control and creates a cleaner, richer finished piece.
Using Markers, Crayons, or Paint
Markers create strong, bright colors and work especially well for cartoon artwork. Test markers on scrap paper because some can bleed through thin paper. Start with lighter colors and add darker details afterward. Crayons are excellent for children because they are simple, colorful, and easy to handle. Layering two crayon colors can also create interesting texture. Watercolor produces a softer holiday style. Light washes of green can form branch layers, while small bright marks can represent ornaments. Acrylic or poster paint works well for larger classroom projects and holiday signs. Whatever medium you choose, plan the basic christmas tree drawing in pencil first. A light sketch reduces placement mistakes. Make sure watercolor paper or thicker mixed-media paper is used for wet paint when possible. Ordinary printer paper can wrinkle when it absorbs too much water.
Creating a Background for Your Drawing
A background can turn a single tree into a complete holiday scene. For an indoor setting, draw a wall, window, rug, fireplace, or simple furniture behind the tree. A window showing falling snow can create a cozy winter feeling. For an outdoor scene, add snow-covered ground, distant pine trees, a small house, or a night sky. Keep background details softer than the main tree. Too many strong lines can compete with your subject. A dark blue night background makes yellow Christmas lights appear brighter. A pale indoor wall creates a cleaner and simpler image. You can also leave the background completely white. This works well for coloring pages, cards, and printable artwork. Before adding a background, decide where the tree should remain the strongest visual focus. Everything else should support that main subject rather than pulling attention away from it.
How to Draw a Christmas Tree at Night
Night scenes allow you to experiment with dramatic lighting. Start with a dark blue, navy, or charcoal background. Keep the tree itself dark green, but do not make it completely black. Add strings of small yellow or colorful lights. Create a soft glow around each light using a lighter version of its color. The star at the top can be the brightest object in the picture. Add reflected light to nearby branch tips. If snow is present, use pale blue and white to show light reflecting from the ground. A few stars in the sky can add atmosphere, but keep them smaller than the tree lights. For an indoor night scene, show a dark window behind the tree and warm light inside the room. Contrast between warm lights and cool shadows can make the artwork feel cozy and festive.
Making a Christmas Card From Your Drawing
A handmade holiday card can make your artwork feel more personal. Fold a piece of thick paper or cardstock in half. Lightly mark the center of the front panel before drawing. Keep your tree slightly smaller than the available space so the design does not feel crowded. A simple christmas tree drawing usually works better on a card than a highly complex scene. Add a few ornaments, a star, and small presents. You can draw snowflakes around the tree or create a thin decorative border. If you want to add a greeting, leave enough empty space above or below the artwork. Sketch lettering lightly before using a pen. Avoid placing text across detailed branches because it can become difficult to read. Let markers or paint dry completely before closing the card. Inside, add a personal holiday message and your signature.
Common Christmas Tree Drawing Mistakes
One common mistake is making the tree perfectly symmetrical. Real trees contain natural differences, and even cartoon trees look more interesting with small variations. Another problem is pressing too hard during the first sketch. Dark construction lines are difficult to erase later. Beginners also sometimes place every ornament in straight rows. Scatter decorations more naturally across different branches. Another mistake is using only one green shade, which can make the tree look flat. Adding darker and lighter areas creates depth. Avoid drawing lights and ornaments before establishing the branch structure. Decorations should follow the tree rather than hide its shape. Finally, do not compare your first attempt with polished professional artwork. Drawing improves through repetition. Keep old sketches instead of throwing them away. When you compare them later, you will often notice progress that was difficult to see while practicing.
How to Make Your Drawing Look More Professional
Start with clean proportions and a clear focal point. The tree should be easy to recognize before decorations are added. Use light sketch lines and erase unnecessary guidelines before applying strong outlines or color. Keep branch patterns varied rather than repetitive. Choose a limited color palette so the finished artwork feels organized. Pay attention to lighting. Highlights and shadows should generally follow the same light direction. Avoid outlining every object with equally heavy lines. Objects closer to the viewer can have stronger edges, while background elements can remain softer. Use reference images when practicing realistic details. Most importantly, stop adding details when the picture already feels complete. Overworking a drawing can make it crowded. A polished christmas tree drawing often succeeds because the artist knows which details to emphasize and which ones to leave simple.
Creative Christmas Tree Drawing Ideas
Once you understand the basic structure, you can create many variations. Try a tree covered with candy decorations and gingerbread ornaments. Draw a snowy tree surrounded by woodland animals. Create a tiny tree on top of a car carrying it home. You can design a tree made entirely from stars, hearts, books, flowers, or geometric shapes. Another idea is a cozy tree beside a fireplace with stockings and wrapped presents. Children may enjoy drawing a smiling tree character wearing a Santa hat. For a more advanced project, draw the tree reflected in a window or shiny ornament. You can also create several small trees with different themes on one page. Experimenting with unusual ideas keeps drawing enjoyable. It also teaches composition, color, and storytelling without feeling like a formal art lesson.
How to Practice and Improve Your Christmas Tree Drawings
Improvement comes from drawing regularly, not from trying to make every picture perfect. Begin with several quick tree sketches. Spend only a few minutes on each one. Change the height, width, and branch shape every time. Next, practice individual details such as stars, bows, ornaments, gifts, and pine branches. These small studies make larger drawings easier. Use reference photos to understand real tree structure, but do not feel required to copy every detail. Try drawing the same tree in cartoon and realistic styles. This teaches you how artistic choices change the mood. Keep your old artwork and date each piece. After several weeks, compare new drawings with earlier ones. You may notice better proportions, cleaner lines, and stronger shading. Practice should feel playful. If one method becomes frustrating, switch materials or try a simpler design before returning to the difficult skill.
Frequently Asked Questions
1. What is the easiest way to draw a Christmas tree?
The easiest method uses three stacked triangular branch sections. Make the top section small and each lower section wider. Add a short trunk, star, round ornaments, and several presents. Once you understand this basic structure, replace the smooth triangle edges with more natural branch shapes.
2. How can kids draw a simple Christmas tree?
Children can begin with three large triangle shapes, one above another. Add a rectangle for the trunk and a star on top. Large circles make easy ornaments. Finish with simple gift boxes underneath. Let children choose their own colors and decorations instead of focusing on perfect lines or realistic details.
3. How do I make a Christmas tree look realistic?
Use irregular branch lengths, overlapping foliage, several green shades, and natural gaps. Add darker values inside the tree and lighter tones on exposed branch tips. Avoid perfect symmetry. Study real evergreen trees to understand how branches grow. Small variations in shape and shading create a more believable result.
4. What colors should I use for Christmas tree artwork?
Traditional colors include green, red, gold, and white. Modern designs can use blue and silver, pink and gold, or neutral shades. Choose two or three main decoration colors for a balanced appearance. Use several green shades if you want the foliage to have more realistic depth.
5. How do I draw glowing Christmas lights?
Draw small bulbs along a curved wire. Keep the center of each light bright. Add a soft area of lighter color around the bulb. Avoid dark outlines around the glow. Lights become more noticeable against darker branches or a night background. Use the glow sparingly for a natural effect.
6. Can beginners make a good Christmas tree drawing?
Yes. Christmas trees are excellent subjects for beginners because their basic structure is simple. Start with large shapes before adding details. Use light pencil lines and work slowly. You do not need perfect symmetry or advanced shading. Each attempt helps improve line control, proportions, color choices, and confidence.
Conclusion
Creating a christmas tree drawing does not require advanced art skills or expensive supplies. Start with a simple overall shape and build the tree from large forms into smaller details. Add natural branch layers, a short trunk, ornaments, lights, garland, and a bright topper. Presents and backgrounds can turn the tree into a complete holiday scene. Use several green shades when you want depth, or choose bright simple colors for a cheerful cartoon style. Most importantly, allow your artwork to look personal. A handmade tree does not need perfect branches or perfectly round ornaments. Small differences often give it more charm. Practice the basic design several times and experiment with new colors, materials, and themes. Whether you are making a greeting card, classroom project, coloring page, or personal artwork, the process should be enjoyable. Pick up your pencil, start with a light shape, and create a holiday tree that feels completely your own.