

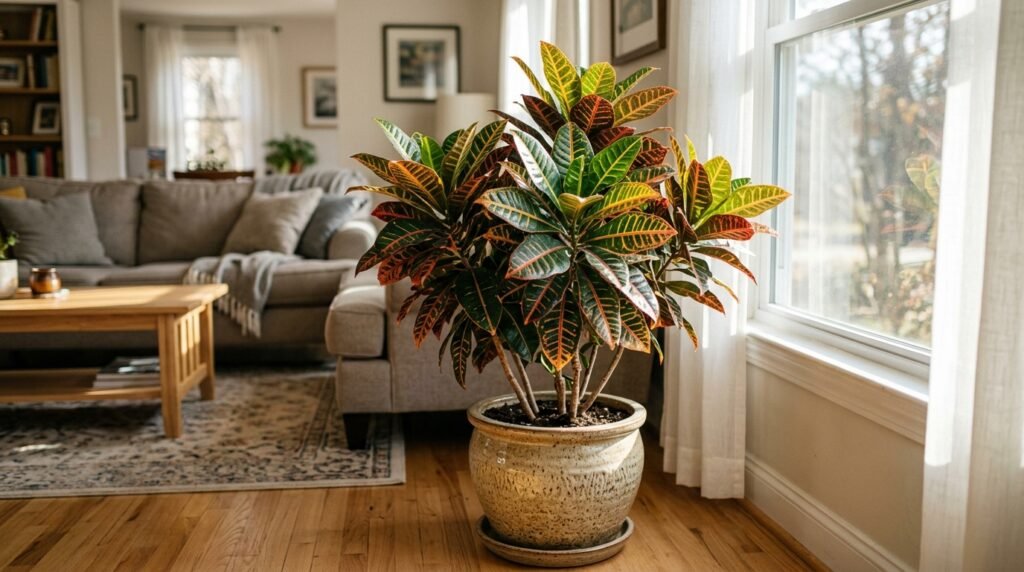
Crotons are famous for leaves that look almost painted by hand. A single plant may show green, yellow, orange, red, and burgundy. This bold color makes croton a popular choice for bright indoor spaces and warm outdoor gardens. However, those beautiful leaves need the right conditions to stay healthy. Good croton tree care starts with bright light, suitable watering, warmth, drainage, and steady conditions. Crotons can react when they are moved or exposed to sudden changes. They may drop leaves after coming home from a nursery or after being placed in a colder room. That does not always mean the plant is dying. The key is to understand what the plant needs and avoid making several changes at once. This guide covers light, watering, soil, humidity, fertilizer, pruning, repotting, pests, leaf drop, propagation, and seasonal care. Whether your croton grows indoors or outside, these practical steps can help you keep its foliage healthy and colorful.
What Is a Croton Plant?
The colorful garden croton is commonly known botanically as Codiaeum variegatum. It is a tropical evergreen shrub grown mainly for its striking foliage. Although people often call a large specimen a croton tree, the plant naturally has a shrub-like growth habit. Mature plants can become tall and woody in suitable tropical conditions. Indoors, their size is usually easier to control through container size and pruning. Croton leaves vary greatly between cultivars. Some are broad and oval, while others are narrow, twisted, or deeply shaped. Their colors can include several shades on the same leaf. Crotons belong to the Euphorbiaceae family. Their sap can irritate skin, and plant material should not be eaten. Keep the plant away from children and pets that may chew leaves. Wearing gloves during pruning is also a sensible precaution.
Why Crotons Need Consistent Care
Crotons are not impossible plants, but they appreciate stability. A plant that receives good light and steady watering can perform very differently from one that is repeatedly moved between unsuitable conditions. Sudden changes in temperature, light, moisture, or location can stress the plant. Leaf drop is one common response. This is why croton tree care should focus on consistency rather than constant adjustment. Choose a suitable location and give the plant time to adapt. Check the soil before watering instead of watering on a fixed calendar. Keep it away from cold drafts and sudden blasts of heating or cooling. Watch new growth and leaf condition over several weeks rather than judging the plant after one day. A stable environment usually gives you a clearer picture of what the croton actually needs.
Best Light for a Croton Tree
Light is one of the most important parts of growing a colorful croton. These plants generally perform best with plenty of bright light. Indoors, place your croton near a bright window where it receives strong natural light. Some direct sun can be helpful when the plant is properly acclimated. However, a croton that has grown in lower light should not suddenly be placed in intense direct sun for many hours. Its leaves may scorch. Increase exposure gradually. Crotons growing in insufficient light may survive, but new leaves can become greener and less colorful. Rotate an indoor pot occasionally so different sides receive light. Do not rotate it constantly if the plant is already stressed. The goal is bright, stable conditions that encourage compact growth and strong leaf color.
Does a Croton Need Direct Sunlight?
A croton can benefit from direct sunlight, but the amount depends on climate, window exposure, and the plant’s previous growing conditions. Gentle morning sun is often easier for indoor plants to tolerate than intense afternoon sun through hot glass. Outdoors, strong tropical or summer sunlight may be much more powerful than indoor window light. Acclimate plants gradually whenever you move them into brighter conditions. Watch the foliage. Pale scorched patches may indicate that light intensity increased too quickly. On the other hand, weak growth and fading coloration can suggest insufficient light. Good croton tree care involves finding the balance between enough light for rich foliage and excessive exposure that stresses the leaves. Remember that sunlight changes with the seasons, so a location that works in winter may become much hotter in summer.
Choosing the Best Indoor Location
A bright room is usually the best starting point for an indoor croton. Position the plant close enough to a window to receive useful natural light. Avoid dark corners where the leaves receive little more than room lighting. Also consider temperature. A sunny window can become cold at night during winter or extremely hot during summer. Keep leaves from pressing against very cold glass. Avoid placing the pot directly beside exterior doors that open frequently during cold weather. Heating vents and air conditioners can also create sudden temperature changes and dry air. Once you find a location where the plant grows well, avoid moving it unnecessarily. Crotons can respond to relocation by dropping leaves. A stable bright location often produces better results than repeatedly searching for a supposedly perfect spot.
How Often Should You Water a Croton?
There is no universal schedule such as “water every seven days.” Soil dries at different speeds depending on pot size, temperature, light, season, humidity, and plant growth. Instead, check the potting mix regularly. Water when the upper layer has begun to dry while avoiding severe, prolonged dryness. When watering, wet the soil thoroughly and allow excess water to drain from the pot. Never leave the root ball permanently sitting in water. Croton tree care becomes much easier when you use the soil as your guide instead of the calendar. A croton growing quickly in bright summer conditions may need water more often than the same plant during slower winter growth. Learn how your individual pot behaves. That observation is more reliable than following a rigid schedule from the internet.
Signs Your Croton Needs Water
A thirsty croton may begin to lose firmness in its leaves. The foliage can droop, and the potting mix may feel dry. The pot itself may also feel noticeably lighter. However, drooping does not always prove that a plant needs more water. Root problems caused by consistently wet soil can also interfere with water uptake. Always inspect the soil before reaching for the watering can. If it is dry enough to need water, soak the root zone thoroughly and allow drainage. Avoid giving tiny amounts that only wet the surface. If the soil is already very wet and the leaves are drooping, adding more water may make the problem worse. Plant symptoms should be considered together with soil moisture, drainage, temperature, and recent care changes.
Signs of Overwatering
Overwatering is not simply giving a plant a large drink. It means the root zone remains too wet for too long. Constantly saturated soil can reduce oxygen around roots and encourage root problems. Warning signs may include yellowing leaves, leaf drop, slow growth, consistently wet soil, and an unpleasant smell from badly affected potting mix. These symptoms can overlap with other problems, so check the root environment before making a diagnosis. Make sure the pot has functioning drainage holes. Empty decorative outer pots or saucers when excess water collects there. If the soil stays wet for an unusually long time, consider whether the container is too large or the mix is too dense. Correcting drainage and watering habits is more effective than simply waiting longer between huge waterings.
The Right Way to Water Crotons
For reliable croton tree care, water the entire root ball rather than pouring a small splash into one corner. Take the plant to a suitable location if necessary and slowly add water across the soil surface. Allow excess water to leave through the drainage holes. Then return the pot to its normal location after it has finished draining. If the soil has become extremely dry, water may initially run around the edges without wetting the center. In that case, water slowly and check whether the root ball is actually absorbing moisture. Avoid keeping a decorative pot filled with standing water. Room-temperature water is generally more comfortable for tropical houseplants than very cold water. The most important rule is simple: water thoroughly when needed, then let excess moisture drain away.
Best Soil for Croton Plants
Crotons need a potting medium that holds useful moisture while still allowing excess water and air movement. Standard high-quality houseplant potting mix can provide a starting point. Depending on the product, growers may improve drainage and structure with suitable amendments. Avoid using dense outdoor garden soil in indoor containers. Garden soil can compact badly in pots and may drain poorly. Whatever mix you choose, pair it with a container that has drainage holes. Even a good potting mix can remain too wet if water has nowhere to escape. Soil structure also changes over time as organic materials break down. If an old mix becomes compacted or drains poorly, repotting may eventually be needed. Healthy roots are the foundation for healthy foliage, so soil quality deserves as much attention as leaf appearance.
Choosing the Right Pot
The ideal pot is only slightly larger than the current root system when repotting is needed. Moving a small croton into an enormous container can leave a large volume of unused wet soil around the roots. This may increase the risk of moisture problems. Drainage holes are essential. Decorative pots without drainage can be used as outer covers, but the croton itself should remain in a draining inner pot. After watering, remove any standing water from the outer container. Pot material can also affect drying speed. Porous containers may dry faster than some glazed or plastic pots. There is no single perfect material for every home. Choose a container based on your climate, watering habits, and plant size. Stability is important for taller specimens because a top-heavy croton can tip over.
Temperature Requirements
Crotons are tropical plants and prefer warmth. They do not appreciate cold conditions or sudden temperature drops. Indoor temperatures comfortable for people are often suitable, provided the plant is not exposed to cold drafts. Avoid placing crotons beside frequently opened winter doors or directly beneath strong air-conditioning vents. Outdoor plants require particular attention when temperatures begin dropping. Crotons are not cold-hardy garden shrubs for every climate. In regions with freezing winters, container plants generally need suitable protection indoors before cold weather arrives. Good croton tree care also means avoiding sudden changes. A warm plant moved directly into a cold environment can respond with leaf drop. If conditions must change, gradual transitions are usually easier on the plant whenever practical.
Humidity and Croton Plants
Crotons come from warm environments and often appreciate moderate to higher humidity. Very dry indoor air can contribute to brown leaf edges or stress, although those symptoms may have other causes too. If your home is dry, grouping compatible plants together may slightly improve the local environment. A room humidifier can provide more reliable humidity control when needed. If you use one, keep it clean according to the manufacturer’s directions. Pebble trays are often suggested, but their effect on whole-room humidity is limited. Misting also produces only a temporary moisture increase and can leave foliage wet. Rather than relying on frequent misting, focus on overall growing conditions. Bright light, proper watering, warm temperatures, and healthy roots remain more important than trying to create constant tropical humidity around one leaf.
Should You Mist a Croton?
Misting is optional rather than essential. A quick spray does not replace proper watering, and it usually does not raise room humidity for long. Wet foliage can also become problematic if air circulation is poor or leaves remain damp for extended periods. If your home is extremely dry, a properly maintained humidifier is generally more effective. You can also clean croton leaves gently when dust builds up. Use a soft damp cloth and support each leaf while wiping it. Clean leaves look better and allow you to inspect for pests at the same time. Avoid applying random oils, mayonnaise, or homemade leaf-shine mixtures. These products are unnecessary and may leave residue. Healthy croton foliage develops its own attractive surface when the plant receives appropriate care.
Fertilizing a Croton Tree
Container plants eventually use nutrients from their potting mix. A balanced fertilizer suitable for foliage houseplants can support active growth when used according to its label. Do not assume that more fertilizer will create more colorful leaves. Excess fertilizer can damage roots and cause salt buildup in the potting medium. Fertilize primarily during periods when the plant is actively growing. Growth often slows during darker or cooler months, especially indoors. Reduce feeding when the plant is not actively producing new growth. If a croton is badly stressed, recently repotted, or suffering from root problems, fertilizer is not an instant cure. Fix the underlying growing conditions first. Healthy roots and sufficient light allow the plant to use nutrients effectively.
How to Fertilize Without Burning the Roots
The safest approach is to follow the fertilizer label rather than making the solution stronger. Different products have different concentrations, so one universal measurement cannot apply to every fertilizer. Applying too much can lead to fertilizer salts accumulating around roots. If you notice a pale crust on the soil or pot edge, review your feeding practices and water quality. Periodic thorough watering can help move soluble salts through a well-draining pot, but do not turn this into constant overwatering. Croton tree care is about balance. Fertilizer should support a healthy plant, not force growth from a struggling one. If you recently purchased the croton, remember that its potting mix may already contain fertilizer. Check product information when available before immediately adding more.
How to Prune a Croton
Pruning can help control size and encourage a fuller shape. Use clean, sharp pruning shears and wear gloves because croton sap can irritate skin. Remove dead or badly damaged growth first. For shaping, make thoughtful cuts rather than removing large amounts of foliage at once. Pruning above suitable nodes can encourage branching below the cut. The best time is generally during active growth when the plant can recover more easily. Avoid severe pruning on a plant that is already stressed by pests, root problems, cold, or recent relocation. Clean tools before and after pruning, especially when working with several plants. If sap touches your skin, wash the area. Keep cut material away from children and pets. A natural, balanced shape usually looks better than repeatedly cutting every branch to exactly the same height.
Encouraging a Fuller Croton
Crotons can become tall and sparse when light is inadequate or when growth is never managed. Start with bright light because pruning alone cannot correct a dark location. When the plant is healthy and actively growing, selective tip pruning may encourage additional branching. Give new shoots time to develop before deciding whether more pruning is needed. Rotate the container occasionally if one side receives significantly more light. However, avoid constant movement. If a plant has become severely leggy, you may need to reshape it gradually over more than one growing period. Removing too much foliage at once can create unnecessary stress. A full croton develops through a combination of good light, healthy roots, reasonable feeding, and careful pruning rather than one aggressive haircut.
When to Repot a Croton
A croton does not need a new pot every few months. Repot when there is a clear reason. Roots circling heavily around the container, roots emerging through drainage holes, extremely rapid drying, or a badly degraded potting mix can indicate that repotting is appropriate. Choose a container only modestly larger than the old one. Use fresh, suitable potting mix and preserve healthy roots as much as possible. Repotting can temporarily stress a croton, so avoid making several major changes at the same time. For example, do not repot, heavily prune, and move the plant from low light into intense sun on the same day. Croton tree care becomes more predictable when changes are made carefully and the plant has time to respond.
Why Croton Leaves Fall Off
Leaf drop is one of the most common concerns with crotons. Unfortunately, there is not one single cause. A croton may lose leaves after being moved to a new home. Cold drafts, major light changes, very dry soil, waterlogged roots, pests, or other stress can also contribute. Start by reviewing what changed recently. Did you move the plant? Has the season changed? Is the soil staying wet much longer? Did the plant experience a cold night? Avoid responding by immediately watering, fertilizing, repotting, and moving it all at once. That creates even more change. Check the basics and correct the most likely problem. If stems remain healthy and growing conditions improve, the plant may produce new foliage during active growth.
Why Croton Leaves Turn Yellow
Yellow leaves can occur naturally as older foliage ages, but widespread yellowing deserves investigation. Check soil moisture first. Constantly wet soil can stress roots, while severe dryness can also damage leaves. Examine the plant for insects, especially on leaf undersides and along stems. Consider light levels and recent environmental changes. Nutrient issues are possible, but fertilizer should not be your first response to every yellow leaf. Overfeeding can create additional problems. Look at the pattern. One old lower leaf turning yellow is different from many leaves changing rapidly. Croton tree care requires observation because similar symptoms can have several causes. Diagnose using the whole plant and its recent history rather than one leaf alone.
Why Croton Leaves Lose Their Color
Crotons are grown for colorful foliage, so fading leaves can be disappointing. Insufficient light is a common reason a plant becomes greener. Move the croton toward brighter conditions gradually rather than placing it immediately in harsh direct sunlight. Remember that leaf color also depends on cultivar and leaf age. Some new leaves emerge with different colors that become stronger as they mature. Seasonal changes in natural light can affect indoor plants too. A window that provides plenty of light during summer may receive much less during winter. Clean dusty leaves so they can receive available light effectively. Avoid assuming fertilizer will restore color. Light is usually much more important for maintaining the strong patterns that make crotons attractive.
Brown Tips and Crispy Edges
Brown leaf edges can develop from several kinds of stress. Very dry air, inconsistent watering, root damage, fertilizer salt buildup, and other environmental problems may contribute. Start with the basics. Check whether the soil repeatedly becomes bone dry. Review fertilizer use and make sure the pot drains correctly. Consider whether the plant sits directly beside a heater or air conditioner. If only a small damaged edge is present, the leaf can still function. There is no need to remove every imperfect leaf. Correct the growing condition and watch new growth. Existing brown tissue will not turn green again, so improvement is judged by healthier new leaves. This is more useful than repeatedly trimming old damage while ignoring the cause.
Common Croton Pests
Indoor crotons can attract common houseplant pests. Spider mites, scale insects, mealybugs, and other sap-feeding pests may appear. Inspect both sides of leaves and check where leaves join stems. Fine webbing, sticky residue, pale speckling, cotton-like material, or small attached bumps can signal trouble. Isolate a badly infested plant from other houseplants when practical. Identify the pest before choosing treatment. Mild infestations may sometimes be reduced through careful cleaning and an appropriate product labeled for the pest and plant. Follow all pesticide instructions exactly. Repeat treatment only as directed because some pests have life stages that survive the first application. Regular inspection is easier than dealing with a large infestation after leaves begin dropping.
Preventing Pest Problems
Healthy plants can still get pests, but routine checks help you catch problems early. Inspect new plants before placing them beside your existing collection. Check leaf undersides, stems, and growing tips. Keep foliage reasonably clean because dust can make small pests harder to notice. Avoid crowding plants so tightly that inspection becomes difficult. When using outdoor spaces during summer, inspect plants carefully before bringing them back inside. Do not automatically spray pesticides as prevention. Unnecessary treatments can create their own problems. Instead, observe regularly and act when a pest is correctly identified. A few minutes of inspection during watering can save significant effort later. Croton tree care works best when pest monitoring becomes part of normal plant maintenance rather than an emergency response.
How to Propagate a Croton
Crotons can be propagated from stem cuttings. Choose healthy material from a plant free of serious pest or disease problems. Wear gloves because cut stems release irritating sap. Use a clean, sharp cutting tool. A stem section with healthy nodes can be prepared for rooting using a suitable propagation method. Many growers root cuttings in a moist propagation medium under warm conditions. Humidity around the cutting can help reduce water loss while roots develop, but excessive wetness can encourage rot. Bright indirect light is usually more suitable than harsh direct sun during early rooting. Propagation takes patience, and not every cutting succeeds. Once a cutting develops a healthy root system and new growth, it can gradually be treated more like an established croton.
Croton Tree Care During Winter
Winter can be challenging for indoor crotons because natural light often decreases while heating makes indoor air drier. Growth may slow, so the plant may use water less quickly. Continue checking the soil rather than following your summer watering routine. Move the croton away from cold drafts and keep it from touching freezing window glass. Provide the brightest suitable natural light available. Fertilizer needs usually decrease when active growth slows. Watch for spider mites because dry indoor conditions can sometimes favor them. Avoid repotting or heavy pruning unless necessary. The goal during winter is often stability rather than rapid growth. When days become longer and the plant resumes stronger growth, you can gradually return to a more active care routine.
Summer Care for Crotons
Summer often provides the warmth and light crotons enjoy, but intense conditions can create new problems. Indoor plants near hot windows may need protection from extreme afternoon heat. Soil can dry faster, so check moisture more frequently. Outdoor container crotons may need even closer monitoring. If moving an indoor plant outside for summer, acclimate it slowly. Start in a sheltered, bright location rather than putting it directly into full sun. Outdoor sunlight is much stronger than light passing through a window. Check regularly for pests and weather damage. Strong winds can tear large leaves or tip over containers. Bring the plant inside before temperatures fall too far. Gradual transitions help reduce stress when moving between indoor and outdoor environments.
Growing Croton Outdoors
Crotons can become striking landscape shrubs in warm climates without damaging cold. They may be used as colorful accents, hedges, or mixed tropical plantings. Choose a location with suitable light and well-draining soil. Newly planted crotons need careful watering while their root systems establish. Established landscape plants may tolerate conditions differently from container-grown specimens, so care should reflect the local climate and soil. In areas that experience frost or freezing temperatures, crotons are usually better treated as seasonal outdoor plants or grown in movable containers. Check local horticultural guidance before planting permanently outdoors. A croton that thrives year-round in a tropical garden may not survive winter in a colder region, even with excellent summer growth.
Indoor vs. Outdoor Croton Care
Indoor and outdoor crotons have the same basic biological needs, but their environments differ greatly. Indoor plants depend on windows for natural light and usually grow in limited potting mix. Outdoor plants may receive stronger sun, wind, rain, and larger temperature changes. Indoor pots require careful drainage because excess water cannot simply spread through surrounding garden soil. Outdoor plants may need protection from extreme heat or cold depending on climate. Pest pressure can also differ. The main lesson is to adjust croton tree care to the growing environment instead of following one fixed routine. Check the actual plant, soil, and weather conditions. A care schedule written for an indoor croton in a cool climate may be completely unsuitable for an outdoor croton in a tropical garden.
Is Croton Safe for Pets?
Croton plants should be kept away from pets that may chew them. Plant material and sap can cause irritation and other problems if contacted or eaten. The safest approach is to place the plant where curious cats, dogs, or other animals cannot reach it. Fallen leaves should also be removed promptly. If you believe a pet has eaten part of a croton, contact a veterinarian or appropriate animal poison service for advice. Do not wait for severe symptoms before seeking guidance. Pet safety should be considered when deciding where to display any houseplant. A beautiful floor-level croton may not be a practical choice in a home with a pet that regularly chews foliage.
Croton Safety Around Children
Croton sap can irritate skin, so keep the plant away from young children who may break stems or handle leaves roughly. Plant parts should not be eaten. Place containers in stable positions where they cannot easily be pulled over. When pruning or propagating, wear gloves and clean tools and work surfaces afterward. Dispose of cut material safely. Wash your hands after handling the plant, especially if sap contacted your skin. These precautions do not mean crotons cannot be grown in family homes. They simply require thoughtful placement. Many common ornamental plants have irritating or toxic parts, so learning about a plant before bringing it home is an important part of responsible indoor gardening.
Common Croton Care Mistakes
Several mistakes appear repeatedly. The first is keeping the plant in a dark corner and expecting brilliant color. Another is watering on a strict schedule without checking the soil. Leaving the pot in standing water can also create root problems. Sudden environmental changes are another common source of stress. Moving a croton from a dim room directly into strong outdoor sunlight can scorch leaves. Cold drafts can trigger leaf drop. Excess fertilizer will not compensate for poor light or damaged roots. Frequent unnecessary repotting can also disturb the plant. Finally, some owners panic after one leaf falls and change every part of the care routine. A better approach is to observe carefully, identify the most likely cause, and make one sensible correction at a time.
A Simple Weekly Croton Care Routine
A simple routine makes croton tree care easier. Once or twice each week, check soil moisture with your finger rather than automatically watering. Look at both sides of several leaves for pests. Notice whether new growth appears healthy and colorful. Remove fallen leaves from the pot surface. Check that the plant is still receiving good light as seasonal sun angles change. Every few weeks, wipe dusty leaves gently when needed. During active growth, follow your fertilizer’s recommended schedule rather than adding extra doses. Occasionally inspect drainage holes and the condition of the potting mix. These small checks take only a few minutes. They also help you notice changes before they become serious problems. Consistent observation is often more valuable than complicated plant-care tricks.
Frequently Asked Questions
How often should I water a croton tree?
Water based on soil moisture rather than a fixed number of days. Check the upper portion of the potting mix and water when it has begun to dry. Water thoroughly, then allow excess moisture to drain. Frequency changes with light, temperature, humidity, season, pot size, and plant growth. Never keep the pot permanently sitting in water.
Why is my croton dropping leaves?
Crotons can drop leaves because of relocation, cold drafts, watering problems, sudden light changes, pests, or other stress. Review what changed recently. Check soil moisture, temperature, drainage, light, and the plant for insects. Avoid making several major changes at once. Once conditions become stable, a healthy plant may produce new growth.
How much light does a croton need?
Bright light is important for strong growth and colorful foliage. Some direct sunlight can be useful when the plant is gradually acclimated. Avoid suddenly moving a low-light plant into harsh sun. If a croton becomes increasingly green or grows weakly, insufficient light may be part of the problem.
How do I make my croton more colorful?
Good light is one of the most important factors. Keep the plant in a bright location and introduce stronger direct sun gradually when appropriate. Healthy roots, correct watering, warmth, and suitable nutrition also support good growth. Remember that color patterns vary by cultivar and leaf age. Fertilizer alone cannot create strong coloration in a plant receiving inadequate light.
Can crotons grow indoors all year?
Yes. Crotons can grow indoors throughout the year when they receive enough light, warmth, suitable watering, and good drainage. Winter conditions may slow growth because days become shorter. Protect the plant from cold windows and drafts. Adjust watering as growth slows instead of following the same routine throughout every season.
Is croton tree care difficult for beginners?
Croton tree care can be manageable for beginners who provide bright light and consistent conditions. The plant’s tendency to drop leaves after sudden changes can make it seem difficult. Avoid overreacting to every leaf. Check light, soil moisture, drainage, temperature, and pests before changing the routine. Once a croton settles into a suitable location, regular care becomes much simpler.
Conclusion
Successful croton tree care is less about special tricks and more about consistency. Give your croton plenty of suitable light, but introduce stronger sun gradually. Check the soil before watering and make sure excess water can escape. Keep the plant warm and away from cold drafts. Use fertilizer carefully during active growth, and prune only when the plant is healthy enough to recover. Inspect colorful leaves regularly for mites, scale, mealybugs, and other pests. If leaves suddenly fall, think about recent changes before making another major adjustment. Crotons can be sensitive when moved, but established plants can reward good care with dense, dramatic foliage. Learn how your individual plant responds to its location, and adjust slowly. With patience and regular observation, a croton can become one of the most colorful plants in your indoor collection or warm-climate garden.