

Painting plastic can give old items a completely new look. A faded outdoor chair can feel fresh again. Storage bins, planters, frames, and decorations can also get an easy update. However, plastic is not always simple to paint. Many plastic surfaces are smooth and do not give regular paint much to grip. Some plastics also contain additives that can make adhesion harder. This is why choosing the best spray paint for plastic matters. A suitable coating should bond well, cover evenly, and match the item’s location and use. Yet paint alone cannot guarantee a good result. Cleaning, surface preparation, spraying distance, coat thickness, temperature, and curing time are equally important. This guide explains how plastic spray paint works and what to look for before buying. It also covers preparation, primer, finishes, outdoor projects, common mistakes, and simple steps that can help your painted plastic look better and last longer.
Why Is Plastic Difficult to Spray Paint?
Plastic often has a smooth, nonporous surface. Paint cannot soak into it like it can with unfinished wood. Instead, the coating must form a strong bond on top. Dirt, grease, mold-release residue, polish, and old coatings can make that bond even weaker. Some types of plastic are naturally harder to paint than others. Polyethylene and polypropylene can be especially challenging because they have low surface energy. Flexible plastic creates another issue. A hard coating may crack when the object bends. This is why a spray paint that works beautifully on one plastic item may perform poorly on another. Before painting, identify the material when possible. Look for a recycling code or material marking. Then check whether the paint manufacturer lists that plastic as a suitable surface. This small step can prevent peeling, cracking, and wasted effort.
What Makes a Spray Paint Suitable for Plastic?
The best spray paint for plastic is not simply the can with the brightest color or strongest marketing claim. It needs to be compatible with the surface you are painting. Some aerosol coatings are specially formulated to bond directly to certain plastics. Others require a separate plastic primer or adhesion promoter first. The product label should clearly explain suitable surfaces and preparation steps. Also consider where the finished object will live. Outdoor furniture needs a coating suitable for exterior exposure. Decorative indoor pieces may have different needs. Flexible objects require more careful product selection than rigid plastic. Drying time, recoat window, finish, color, and coverage also matter. Most importantly, read the complete technical directions before beginning. Two spray paints that look similar on a store shelf may require very different preparation and application methods.
Identify the Type of Plastic First
Many plastic items have a small recycling symbol with a number or letters. These markings can offer clues about the material. Common plastics include PET, HDPE, PVC, LDPE, polypropylene, polystyrene, and several mixed materials. However, a recycling code does not automatically tell you whether a particular spray paint will bond successfully. Some items also have coatings or additives that change surface behavior. Treat the code as a starting point rather than a guarantee. If you cannot identify the plastic, check the manufacturer’s information for the object. You can also test your painting system on a hidden area before coating the entire piece. Allow the test area to cure fully before checking adhesion. This is especially important for valuable furniture or items that would be difficult to replace. A small test can reveal compatibility problems before they affect the whole project.
Look for Paint Designed for Plastic
When comparing products, look for clear wording that says the coating can be used on plastic. Do not assume that a general-purpose aerosol automatically works on every plastic surface. The best spray paint for plastic projects usually comes with clear instructions about compatible materials. Some formulas are promoted as direct-to-plastic coatings. Others are designed for several surfaces but may need a special primer on plastic. Read both the front and back of the can. Manufacturer websites may provide additional technical sheets and application details. Pay attention to exclusions. A product may work on rigid outdoor furniture but not on very flexible vinyl or soft plastic. Compatibility matters more than brand popularity. If the manufacturer does not recommend the product for your material, choose another coating rather than hoping extra coats will solve the problem.
Do You Need Primer Before Spray Painting Plastic?
Primer can improve adhesion on many surfaces, but whether you need it depends on the paint and plastic. Some spray paints are formulated to bond directly to compatible plastics and may not require a separate primer. Other products specifically tell users to apply a plastic primer or adhesion promoter. Follow the directions for the exact coating system you choose. Adding an unnecessary primer is not always helpful because incompatible layers can create new adhesion problems. On difficult plastics, a suitable adhesion-promoting product can make a major difference. If the item already has an old finish, preparation may also change. Sanding, priming, or removing loose coating could be necessary. Never assume that one preparation method applies to every plastic project. The manufacturer’s instructions should guide your choice because the chemistry of the paint and primer must work together.
Clean the Plastic Before Painting
Good preparation starts with a clean surface. Dust, skin oils, grease, wax, and household cleaning residue can interfere with paint adhesion. Wash the object according to the coating manufacturer’s preparation instructions. For many household projects, mild soap and water can remove basic dirt. Rinse away soap residue and let the item dry completely. Greasy surfaces may require a compatible cleaner, but avoid strong solvents unless the manufacturer says they are safe. Some solvents can soften, discolor, or damage plastic. Wear clean gloves after preparation if touching the surface could transfer skin oils. Cleaning may feel like the least exciting part of a painting project, but it is one of the most important. Even the best spray paint for plastic can peel when applied over contamination. Taking a little extra time before spraying can save much more time later.
Should You Sand Plastic Before Spray Painting?
Light sanding can create a slightly rougher surface that helps some coatings grip. However, it is not required for every paint or plastic. Check the paint directions first. If sanding is recommended, use the suggested grit and work gently. The goal is usually to dull a glossy surface, not carve deep scratches into it. Aggressive sanding can leave marks that remain visible through the finished paint. It can also damage thin plastic. After sanding, remove all dust before applying primer or paint. A clean lint-free cloth or another manufacturer-approved method can help. Decorative items with fine details may be difficult to sand evenly, making a direct-bond coating more convenient when compatible. Always test a hidden spot first if you are unsure how the plastic responds. Proper surface preparation should improve adhesion without changing the shape or texture of the object.
Choose the Right Finish
Spray paint comes in several finishes, including matte, flat, satin, semi-gloss, and gloss. The right choice depends on the appearance you want and the item being painted. Matte finishes create a soft look with little reflection. They can work well on planters, decorative pieces, and modern home accessories. Satin provides a gentle sheen and is a versatile option for many projects. Gloss creates stronger reflections and may give an item a polished appearance. However, shiny finishes can make surface imperfections more visible. The best spray paint for plastic should therefore provide both suitable adhesion and the finish you actually want. Do not choose a glossy product only because you think it will automatically be more durable. Durability depends on the entire formulation, preparation, application, and environment. Always compare the product’s intended use rather than judging performance from sheen alone.
Best Spray Paint for Outdoor Plastic
Outdoor plastic faces sunlight, rain, temperature changes, dirt, and regular handling. Therefore, choose a coating specifically approved for exterior use and compatible with the plastic. Look for manufacturer information about weather resistance and outdoor durability. Even exterior paint can eventually fade or wear when exposed to harsh conditions. Color choice may also affect how noticeable fading becomes. Outdoor furniture should be cleaned thoroughly because years of use can leave dirt, sunscreen, oils, and environmental residue on the surface. Allow the item to dry fully before painting. Work within the temperature and humidity range listed on the can. Avoid spraying when rain is expected before the coating has enough time to dry or cure. For the best spray paint for plastic outdoors, compatibility and correct application are more important than simply choosing a product labeled as “tough.”
Spray Painting Plastic Outdoor Furniture
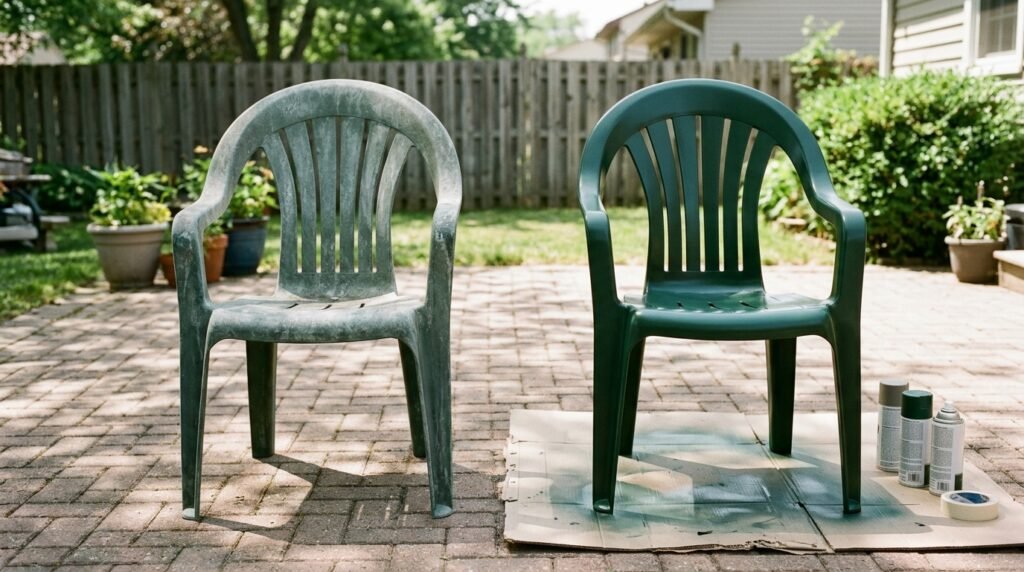
Plastic chairs, small tables, and garden furniture are popular painting projects because color can fade over time. Start by checking the furniture material and condition. Paint cannot repair structural cracks or badly weakened plastic. If the chair is unsafe, replacing it is better than hiding the damage. Clean sound furniture carefully and follow the chosen paint’s preparation directions. Remove loose old coatings if necessary. Spray thin, even layers rather than trying to cover the original color with one heavy coat. Pay attention to edges, legs, and curved areas where overspray can build up. Allow each coat to dry according to the label. After the final coat, give the furniture enough curing time before sitting on it. A surface that feels dry may still be soft underneath. Early use can cause marks, sticking, or premature wear.
Spray Painting Plastic Planters
Plastic planters are another easy way to introduce color into a patio or garden. Before painting, empty the planter and clean the outside thoroughly. Mineral deposits, soil, fertilizer residue, and algae can interfere with adhesion. Make sure the container is completely dry. Check that your chosen coating is suitable for both plastic and outdoor use. In many cases, painting only the exterior is the simplest approach. Avoid coating areas that will remain constantly wet unless the product specifically allows it. Do not block drainage holes with paint. If the planter holds edible plants, follow all product safety instructions and avoid spraying surfaces that could contact food or soil when the manufacturer does not approve such use. The best spray paint for plastic planters should provide suitable adhesion while handling the conditions of the location where the planter will remain.
Spray Painting Indoor Plastic Decor
Picture frames, storage accessories, lamp bases, decorative containers, and other plastic pieces can often be refreshed with spray paint. Indoor items face less weather exposure, but surface preparation still matters. Remove dust, oils, stickers, and adhesive residue before painting. Take removable parts apart when possible so you can achieve cleaner coverage. Mask any areas that should remain unpainted. Always spray in a location that meets the product’s ventilation and safety instructions. Do not spray aerosol paint in a closed living room simply because the final item will be used indoors. Once painted, allow the piece to cure before returning it to normal use. Be cautious with objects that become hot, contact food, or are handled by small children. Standard decorative spray paint may not be appropriate for those applications unless the manufacturer specifically says it is.
How to Prepare Your Painting Area
A good painting area protects both your project and the surroundings. Aerosol overspray can travel farther than expected. Work in a well-ventilated location permitted by the product instructions. Protect floors, walls, nearby cars, plants, and other objects with suitable coverings. Avoid open flames, sparks, smoking, and ignition sources because many aerosol products contain flammable materials. Read all safety warnings on the can before starting. Weather matters when working outside. Strong wind can blow paint away from the project and carry overspray onto nearby surfaces. Very high humidity or temperatures outside the recommended range can affect application and drying. Place small objects on a stable surface where you can reach all sides safely. Planning the work area before opening the can makes spraying easier and reduces the chance of messy accidents.
How to Apply Spray Paint to Plastic
Once the surface is prepared, shake the can exactly as directed. Test the spray pattern on scrap cardboard or another safe surface. Hold the can at the distance recommended by the manufacturer. Begin moving before pressing the nozzle, then pass smoothly across the object. Release the nozzle after moving beyond the edge. This can reduce heavy spots at the beginning and end of each pass. Slightly overlap each pass for more even coverage. Do not stop in one place while spraying because paint can build up and run. Several light coats usually create a cleaner result than one thick coat. The best spray paint for plastic still needs good technique. Rotate smaller objects when safe instead of twisting your arm into awkward positions. Follow the stated recoat window because waiting too little or too long can affect the finish.
Why Thin Coats Work Better
It is tempting to cover the original color in one pass, especially when changing from dark plastic to a light shade. Heavy coats, however, are more likely to run, sag, wrinkle, or remain soft. Thin layers allow more controlled coverage. The first coat may look uneven or partly transparent, and that is often normal. Let it dry for the recommended time before applying another coat. Gradual coverage also makes it easier to see whether the paint is reacting badly with the surface. If the coating begins bubbling, lifting, or wrinkling, stop and investigate rather than adding more paint. Thick layers do not solve adhesion problems. They may actually make failure more noticeable. Patience is one of the simplest ways to improve a spray-painted finish. Smooth results usually come from preparation and controlled layers, not from applying as much paint as possible.
Understanding Dry Time and Cure Time
Dry time and cure time are not the same thing. Paint may become dry to the touch fairly quickly while remaining soft underneath. Curing is the longer process in which the coating develops its final properties. The exact timing varies by product, temperature, humidity, coat thickness, and surface. Read the label for specific guidance. Avoid heavy handling before the coating has cured enough for normal use. This matters especially for chairs, storage bins, handles, and other frequently touched items. If you place objects on a soft painted surface too early, they may stick or leave impressions. The best spray paint for plastic can still perform poorly if the object is used before curing. When possible, give the project more undisturbed time rather than rushing it back into service. A little patience at the end can protect all the work done earlier.
How Temperature and Humidity Affect Spray Paint
Aerosol coatings are designed to work within certain environmental conditions. If the temperature is too low, drying may slow and the finish may not develop properly. Very high temperatures can create different application problems. High humidity may also affect drying and appearance. This is why the label usually provides a recommended temperature range and other application guidance. Do not ignore these instructions simply because the plastic looks dry. Outdoor painters should also consider wind and direct sunlight. A surface heated by strong sun can be much warmer than the surrounding air. Moving the item to a shaded work area may provide more controlled conditions when allowed by the product directions. If weather conditions are unsuitable, waiting for a better day is often easier than repairing a poor finish. Environmental conditions are an important part of successful spray painting.
How Many Coats Does Plastic Need?
There is no universal number of coats for every project. Coverage depends on the product, original surface color, new color, spray technique, and shape of the object. Some projects may achieve good coverage after a few light coats, while others need additional layers. Follow the paint manufacturer’s guidance and stop when the surface has even coverage. More paint is not always better. Excessive coating thickness can increase drying time and may affect performance. Complex shapes often require careful spraying from several angles. Apply each layer lightly rather than trying to fill missed areas with a heavy blast. If you are changing from very dark plastic to a much lighter color, expect coverage to take more patience. The goal is a consistent film, not the highest possible number of coats. Let appearance and product directions guide the process.
Do You Need a Clear Coat?
A clear topcoat can change sheen or add another coating layer, but it is not required for every plastic painting project. Some spray paints are designed as complete finishes and do not need anything on top. Applying an incompatible clear coat can cause wrinkling, lifting, discoloration, or other problems. Before adding one, check whether the paint manufacturer recommends a compatible clear finish. If you want extra protection, use products designed to work together. Remember that a clear coat cannot fix weak adhesion underneath. If the base paint does not bond properly to the plastic, adding another layer will not solve the problem. The best spray paint for plastic project uses a complete coating system rather than random products from different lines. Test the combination on a hidden area if there is any uncertainty and allow enough time to observe the result.
How to Avoid Drips and Runs
Runs usually happen when too much wet paint builds up in one area. Holding the nozzle too close, moving too slowly, or repeatedly spraying the same spot can cause this problem. Follow the recommended spraying distance and keep the can moving. Apply thin passes and resist the urge to fix a light area immediately with a heavy coat. You can return to it during the next layer. Curved objects and corners deserve extra care because spray patterns overlap easily there. If a run appears, do not immediately wipe wet paint unless the manufacturer’s directions support that approach. Touching the area may create a larger mess. Often, the safest solution is to let the coating dry, then follow appropriate repair instructions. Practicing on cardboard before the project can help you understand the nozzle and spray pattern.
How to Prevent Peeling Paint
Peeling often points to poor adhesion. The surface may have been dirty, incompatible with the paint, too glossy, or prepared incorrectly. The object may also have been handled before the coating fully cured. Flexible plastic can cause another problem because rigid paint may crack and lift as the material bends. Prevention starts before spraying. Identify the plastic, choose a compatible coating, clean thoroughly, and use any required primer or adhesion promoter. Apply the product within recommended environmental conditions and respect the recoat and cure times. The best spray paint for plastic cannot overcome every surface problem by itself. If old paint is already peeling, spraying over it will usually create a weak foundation. Remove loose material and follow the manufacturer’s preparation recommendations before repainting. A durable finish depends on every layer beneath the visible surface.
Common Spray Painting Mistakes
Several simple mistakes can ruin an otherwise easy project. Skipping cleaning is one of the biggest. Another is assuming that all plastics accept the same paint. Heavy coats can lead to runs, wrinkles, and slow curing. Spraying too close creates uneven buildup, while spraying too far away may create a rough finish with some products. Ignoring recoat times can also cause problems. Painting in strong wind increases overspray and makes coverage difficult. Using harsh solvents without checking compatibility can damage plastic before painting even begins. Another common mistake is rushing the item back into use because the surface feels dry. Remember that full curing can take longer. Finally, avoid mixing primers, paints, and clear coats without confirming they are compatible. A simple, manufacturer-approved system is usually safer than combining several products and hoping they work together.
Safety Tips When Using Spray Paint
Aerosol paint requires careful handling. Read the full safety label before use. Work with the ventilation recommended by the manufacturer and avoid breathing spray mist or vapors. Follow any instructions about respiratory, eye, skin, or other personal protection. Keep spray cans away from heat, sparks, flames, and smoking materials. Do not puncture or burn aerosol cans. Store and dispose of them according to local rules and label directions. Protect children and pets by keeping them away from the work area and uncured project. Overspray can travel, so protect nearby property as well. If you feel dizzy, unwell, or experience unusual symptoms while using a product, stop exposure and follow the safety guidance on the label. Safe preparation is part of a successful DIY project and should never be treated as an optional extra.
Can You Spray Paint Flexible Plastic?
Flexible plastic can be more difficult to coat because it bends during use. A hard paint film may crack when the surface flexes. Some flexible materials also contain additives that interfere with adhesion. If you need to paint a flexible item, look for a coating specifically approved for that material and application. Do not assume that the best spray paint for plastic furniture will also work on a flexible plastic bag, vinyl-like surface, or bendable automotive part. Product compatibility should be confirmed first. A hidden-area test is particularly useful for flexible objects. Bend the test area only after the coating has fully cured and see how it responds. If it cracks or separates, the system is unsuitable. Sometimes leaving flexible plastic unpainted is better than applying a coating that will quickly fail.
Can You Repaint Previously Painted Plastic?
Yes, but the existing finish must be sound enough to support the new coating. Check for peeling, bubbling, cracks, or loose paint. A new layer applied over weak old paint can peel away with it. Remove loose material according to safe preparation methods. Clean the surface and follow the new coating manufacturer’s instructions for previously painted surfaces. Some finishes may need light sanding or primer. Compatibility between old and new coatings can also matter. If you do not know what product was previously used, test a small hidden area first. Watch for lifting, wrinkling, softening, or other reactions. Repainting can save furniture and decorative objects, but it requires more inspection than painting clean new plastic. The final finish is only as reliable as the layers underneath it.
How to Choose the Best Spray Paint for Plastic
Start with the object, not the paint color. Identify the type of plastic if possible and decide whether the item will remain indoors or outdoors. Consider whether it is rigid or flexible and how often it will be handled. Next, find coatings that clearly list your surface and intended environment as suitable. Check whether a primer is required. Compare finish options, recoat times, curing instructions, and coverage. Read safety information before purchasing so you know whether you have a suitable work area. For outdoor projects, confirm exterior use. For items exposed to heat, food, water, or constant skin contact, check whether the coating is specifically approved for that application. The best spray paint for plastic is ultimately the product that matches the material, use, environment, and preparation method of your particular project.
A Simple Checklist Before You Start
A short checklist can prevent many common problems. First, identify the plastic or gather as much information about it as possible. Second, confirm that your chosen paint is compatible with that surface. Third, read the complete directions before preparing the object. Clean the plastic and perform any recommended sanding or priming. Choose a safe, well-ventilated painting location and protect the surrounding area from overspray. Check weather conditions if working outdoors. Shake and test the spray can before coating the project. Apply light, controlled layers and follow the stated recoat time. Finally, allow the finished item to cure before normal use. These steps may sound simple, but they address most of the reasons spray-painted plastic projects fail. Good preparation usually matters more than rushing toward the final color.
Frequently Asked Questions
What is the best spray paint for plastic?
The best spray paint for plastic is one specifically listed as compatible with the type of plastic you want to paint. Some products bond directly to certain plastics, while others require a plastic primer or adhesion promoter. There is no single formula that is best for every object. Consider whether the item is rigid or flexible and whether it will stay indoors or outdoors. Always follow the manufacturer’s surface preparation, application, recoat, and curing instructions for the specific product you choose.
Do I need to sand plastic before spray painting?
Not always. Some coatings are designed to bond to compatible plastic without sanding. Others may recommend lightly roughening a glossy surface. Check the product instructions before starting. If sanding is required, use the recommended grit and avoid creating deep scratches. Clean away all sanding dust before painting. Sanding cannot make an incompatible paint suitable for every type of plastic, so product selection remains important. Testing the complete preparation and paint system on a hidden area can help when you are unsure.
Can I spray paint plastic without primer?
Yes, certain spray paints are formulated to bond directly to compatible plastic surfaces without a separate primer. Other products require primer for good adhesion. Follow the instructions for the exact spray paint you are using. Do not skip primer when the manufacturer requires it. At the same time, adding a random primer to a direct-to-plastic paint can create compatibility issues. Use a coating system designed to work together. Proper cleaning and preparation are still necessary even when no primer is required.
How long does spray paint take to dry on plastic?
Drying time varies by product, temperature, humidity, airflow, and coat thickness. The label should provide specific dry and recoat times. Remember that dry-to-touch time is different from full cure time. A painted item may feel dry while the coating remains soft beneath the surface. Avoid heavy use until the paint has cured as directed. Chairs, handles, and other frequently touched objects especially benefit from extra curing time. Heavy coats generally take longer to dry than properly applied thin coats.
Can spray-painted plastic stay outdoors?
Yes, when both the plastic and coating system are suitable for outdoor use. Choose a spray paint specifically approved for exterior conditions and your plastic surface. Proper preparation remains essential. Outdoor exposure can eventually cause fading, wear, or other changes, even with exterior coatings. Sunlight, rain, heat, cold, and frequent handling all affect durability. Follow the product’s instructions and avoid assuming that a general indoor spray paint will provide the same performance outdoors.
Why is spray paint peeling off plastic?
Peeling usually means the coating did not form a strong bond. Common causes include dirt, grease, incompatible plastic, skipped primer, incorrect preparation, heavy coats, or using the object before full curing. Flexible plastic can also cause rigid coatings to crack and separate. To prevent peeling, identify the surface, choose a compatible paint, follow all preparation steps, and respect drying and curing times. If existing paint is already peeling, remove loose material before repainting rather than covering the weak layer with more paint.
Conclusion
Finding the best spray paint for plastic starts with understanding the project rather than choosing a color first. Plastic surfaces vary greatly, and some are much easier to paint than others. Identify the material when possible and choose a coating that clearly lists it as compatible. Clean the surface carefully, use primer when required, and apply several controlled coats instead of one heavy layer. Pay attention to temperature, ventilation, recoat windows, and curing time. Outdoor furniture and planters need products intended for exterior conditions, while flexible plastics may require specialized coatings. Most failed projects are not caused by color choice. They come from poor compatibility, rushed preparation, or incorrect application. With the right product and a patient approach, many plastic items can receive a smooth, attractive finish that gives them a useful second life.